Teletraan 1
While watching classic G1 Transformers cartoons, I found myself tinkering with some foam and before I realised it was taking shape into Teletraan 1.
Building the Scene
Using layers of 20 mm thick foam to create the console and monitor, I have sanded down the foam to achieve the angles that make up this computer. The basic shape is done but still a fair way to go!


While watching the classic cartoons, I realised Teletraan’s monitor angled up. So to achieve this, I cut diagonally across the back of the base and glued the two parts together.
I added a back piece for Teletraan so it can sit flush up against a wall and then built up creating the plummet to Teletraan with a lip. Using card to create the sides for Teletraan and the insides of the two front alcoves.
Thinking that I had finished the build until I got a couple of figures in front of Teletraan and realised it need another layer of foam. I cut a piece of 10 mm, stuck it to the under side of Teletraan and then sanded the middle until it blended the middle.


Now all that I need to do is start carving and adding the detail.
I’ve etched the detail onto Teletraan 1.


With the scoring done, I’ve chopped up an expired credit card and used it to create panels and buttons across the surface of Teletraan.
I then took small pieces of foam and sculpted them into three devices commonly seen on Teletraan. Then to finish off I have added the Autobot insignia and glued it to a central spot on the plummet of Teletraan.


Now the computer is done, I am going to create a diorama with couple of consoles for Teletraan to sit in before painting.
I’ve undercoated Teletraan 1 and while I’m waiting for the paint to dry, I thought I start with the rest of the piece. I’ve cut a piece of board 11″ x 10″ and penciled out the metal plating, I’ve also cut out the back and two side panel’s. These will have the panelling pencilled on and the smaller consoles made.


The panelling on the both the floor and back wall have been first drawn out and then engraved into the foam. I have cut the side wall and have glued them onto a second piece of foam each. Once they have dried I will etch panelling into the them. Once the walls are done I can then build the smaller consoles.


The walls have been etched and applied magnetic tape to walls, I’ve done this incase I want to extend diorama by adding another floor piece and back wall.
The next phase is to make the consoles to sit either side of Teletraan.


I’ve made the first of two consoles that will sit either side of Teletraan. Just need build another and to engrave them similar to Teletraan and how it looked in the 80’s cartoon.


I’ve made a second smaller but higher console to be placed the other side to Teletraan. The hot glue melted some of the foam which I have filled using liquid Green Stuff, when it’s dry I’ll sand it down and start adding detail to them both.


I’ve completed the engraving on the foam consoles, made a couple of wall mounted monitors and a small Soundwave who can sit on top of the consoles and Teletraan. The next step is to add some plastic card buttons before I give this all a black undercoat.


Painting the Scene
Painting is underway in the Ark, I’ve mixed up a bright orange with I am applying two coats because the first coat is too dark. Teletraan and the consoles are also having their second coat added, the first coat I used a new air brush paint which would be fine to use as a second coat but not a first. The paint was too thin for the foam.


When this dries, a second coat will be applied to the back wall and floor and then again to the consoles and Teletraan.
It’s taken a couple of days to finally get this looking as I wanted it. Word to the wise never undercoat with black when you want to base coat with orange! The orange paint was soaking into the black undercoat where it looked like a black console with an orange shade.


I can now get on with shading and painting in the detail!
The little Soundwave looks great on this!
I’ve doing a little detail work, applying shading, painting the monitors, buttons, lights and the insignia. Starting to look more like it did in the cartoon.


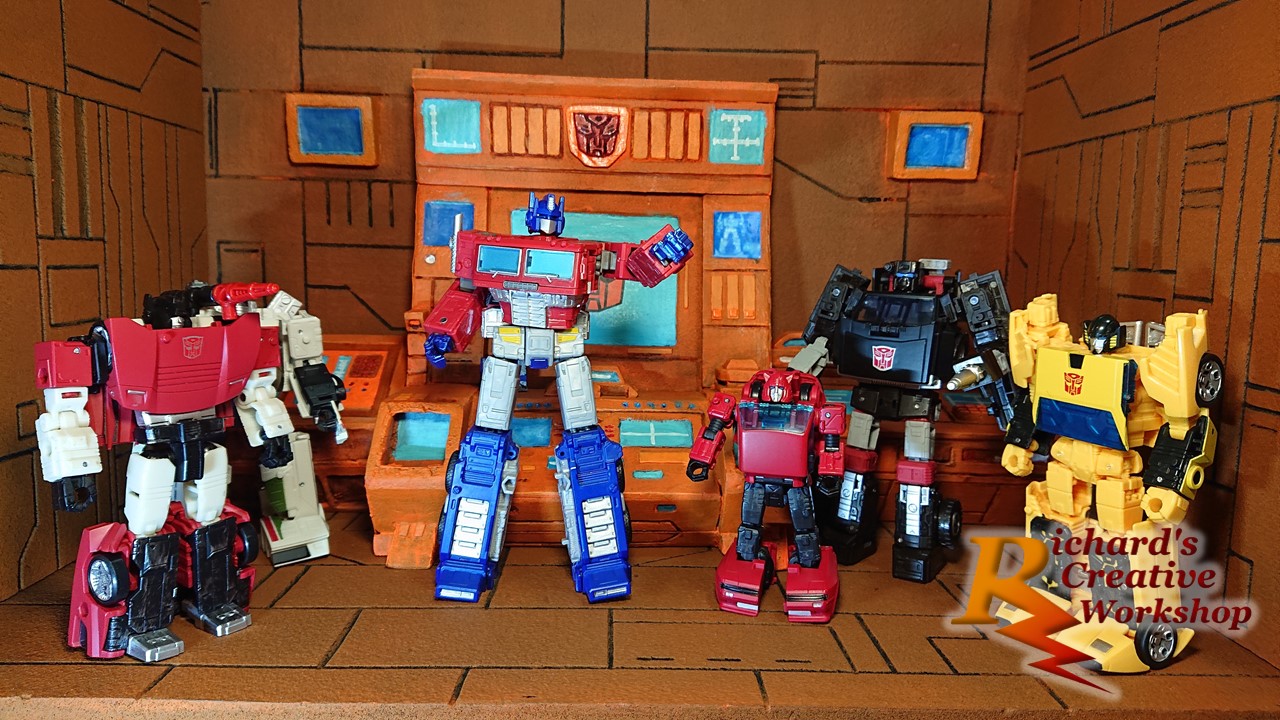
Autobots transform and roll out!


I have completed the painting of Teletraan and the two consoles, applied a few decals on the monitors and I’m currently looking for the perfect image to place on Teletraan centre screen. Do I go G1 cartoon, from a comic, add a grid or a huge Autobot insignia?


To finish I have painted the back black using black poster paints.


