InspirEd Workshop Commissions
I am working along side InspirEd Workshops and Bradford’s National Media Museum to create eight diorama’s for InspirEd’s stop motion classes.
- Building the Scenes
Building the Scenes
The eight diorama’s are my standard size of 15″ x 14″ x 10″.
I have cut the boards make five dioramas.

I’ve used PVA glue to glue the layers together, using heavy comic book novels to apply equal pressure to each model. Once these are dry, I can start molding them into scene’s.


Building a Loft Apartment
For the first diorama of the eight I am building an apartment room. The walls are held together using magnetic tape. The work done so far has been to cut a door frame into the first layer of foam. The door is made from bolsa wood.


I have pencilled into all three walls the brick work which I will score out. 0.5″x1″ brick. The floor I have also pencilled in 1″x5″ floor board’s, also ready to be scored.


The right wall I have cut out a window, where I will insert a piece of perspex and build around it a window frame.


For the floor I have used a wire brush to give it the wood effect. I then scored around the bricks before creating the door frame.


While contemplating what do next before adding the window, I decided to start making some accessories. To start with I have created an armchair, modelled here by Harley Quinn


The next of accessories made for this piece is side board/workbench and a wall mounted TV.


The table is made using 6mm foam board and bolsa wood for the doors and draw. The flat screen is made from a piece of 10mm board.


I was able to cut the window for the first diorama. Using strips of bolsa wood to create the frame for the window.


Painting the Loft Apartment
I’ve undercoated the Loft Apartment diorama


Painted the walls of the Loft Apartment, gave the walls a base coat of light grey. When it had dried I added burnt umber to the grey mixture, then given the walls a second coat. The door I have painted a light blue.


Next step is to start painting the accessories I have made for this.


I made a light brown and using a sponge to day it over the bricks, I then edged the workbench using it.


The Loft diorama, I repainted the door, cut out two images and stuck them onto thin pieces of bolsa wood and glued them on to the walls.
One of the things on the brief with the eight commissions, they have to be wipe able. I have bought Deco Art DuraClear Matte Varnish, and have applied a layer on each of the four pieces.


All that is left for me to do now is paint the outside of this piece with black.
Final Pictures


Building a Castle Room
I started the second piece. This piece is being based on a medieval castle.
Taking one of the pre-cut bases, I’ve added the magnetic tape. I have then cut two domed doorways into the top layer of foam of the back and right walls. The right wall door is 10 cm higher because it will have a couple of steps.


With the doorways cut, I pencilled in the brickwork on the floor and the walls. I created steps for the second door.


To finish off this evenings work, I have cut a pair off door using bolsa wood. Which when finished will be glued into place.


Border adding anything else to this build, I scored out the brick work using pottery tools.


I have started to make the bolsa wood look like heavy oak doors. I have also added three load bearing columns onto the walls. This has almost concluded the overall build.


I added some details on to three columns. The next step is to use Green Stuff to create door handles and rivets.


Using Green Stuff I’ve made the door handles and bolts for doors. The build is now complete so I can concentrate on the build of the third piece.


Painting the Castle
I’ve undercoated the Castle diorama


Final Pictures


Building a Loading Bay
I have started the groundwork for the third diorama, I added magnetic strips to the third diorama.

I have started working on brick work.


Finished marking up the bricks in the third wall and taking one of the round ended pottery tools, I have scored out the bricks. I have also cut the top layer of board out on the third wall to make another door for this piece.


I’ve cut two doors out of bolsa wood. Built the frame for the garage door and I’m using corrugated card for that.


Painting the Loading Bay
The loading bay I’ve undercoated with black, once dry dabbed over the bricks with Burnt Umber.


I have marked out the bay lines, white lines around steps.
I added GW Agrax Earthshade to both doors, created handles to them and glued them into places.
The Bay door has been shaded with Agrax Earthshade. Painted the door with a light grey and then dry brushed with Games Workshop Necron Compound.
With the left wall using paint pens added a little graffiti, added decals to walls. The walls and floor have been varnished to make the wipe able.


Final Pictures


Building the Scenes a Station Alcove


Taking a round headed pottery tool, I have scored and marked out the brick work.


I have used bolsa wood to create the doors and door frames on both walls. A couple of long strip of foam board was used to make the guttering, along with a single strip to create a step for the door.


Painting the Loft Apartment
After doing a black undercoat, I have base coated with a light burnt umber. The idea is to them layer with a couple of different tones of brown before weathering.


Mixing up a brown and using a sponge to dab the brown over all of the walls. I added to white to the brown and using the sponge to dry dab the the light brown over all of the surfaces.


I’ve added a couple of cables, then made a dirty brown and dry brushed areas of the diorama.
The double has been painted red, highlighted with GW Wild Rider Red and then weathered with the dark brown.


Just a couple of little things to do before this piece is completed.
Final Pictures


Building Mos Eisley
For the fifth piece, I wanted to do something different. So far I’ve done a loft apartment, a room in a castle, a loading bay, a building alcove. This piece I wanted to do a science fiction diorama, but what to do? In the end I have decided to base this diorama on a space port found on a planet located in outer rim of galaxy far, far away!
It is the same size build as the previous four. I have cut a seven inch porch, three wall braces and cut a doorway into the right wall.


The porch entrance and the braces I have cut grooves into the walls for these to be glued into place.


Mixing sand with filla, this was used to cover the floor and the porch entrance.


While trying to decide which way to go with the walls, I also wanted to break away from making another obvious box diorama. I located and printed a picture of Mos Eisley. Under present Corvid19 lock down I only have access to my own A4 printer. To hide the edges of the paper, I’ve cut out an archway. This now creates depth to this piece.


When I’ve decided which way to go with the walls, I’ll glue the picture to the foam using spray adhesive, then coat the picture with a layer of matt varnish before coating the walls.
It started with cutting out the right wall door using 2mm bolsa wood and then taking another piece and cutting out the shapes for the top layer. After gluing the two sides together it was the sprayed with black paint. I made an archway to go around the door.


Painting Mos Eisley
The walls where done using watered down filler mixed in with tan acrylic paint. Once applied to each wall and bridge, I smoothed it down. The back wall, I used spray adhesive to stick the image down and then added a coat of varnish to it.


The open doorway I cut out small pieces of card and glued them round the arch.
When the walls had dried, I used Games Workshop’s Agrax Earthshade to weather areas of the walls, braces and porch.


The smaller door was painted with GWs Steel Legion Drab and dry brushed with Necron Compound. Agrax Earthshade was gently added to door.
The pipes and other wall accessories where painted with GW Leadbelcher, shaded with Nuln Oil and dry brushed with Necron Compound.
Using the Tan acrylic mix I painted the inside of porch and dry brushed the wall, braces and porch with it.


Just a couple of finishing touches to be done and then this piece will be finished.


Final Pictures


Building a Cargo Bay
For the sixth piece I’m sticking with science fiction, this diorama will be a cargo bay on a spaceship. More importantly it is going to be based on the cargo bay from the Star Wars ship The Ghost from the series Star Wars Rebels. While I am building this, I am building my own, which I’ll cover in a separate post.
For this build is the same size as the other five, the sides held together with magnetic tape. The boards where cut yesterday and glued together using PVA glue. When using PVA to stick boards together, it can take up to 48 hours to glue two waterproof pieces of foam board together. While the glue is drying, it is the best time to cut out doors, windows, etc from one layer without accidentally damaging the second layer. I’ve cut out a door frame and conduits, leaving any further work until the boards have fully dried.


I started on the base, sticking embossed diamond plastic card as a walkway, while adding a border to the walkway. I marked out 3″ x 3″ squares to the base.


I made four bulkheads, cut two 20 mm slats into both walls which the bulk heads slide into.


The back wall I built up the wall using a combination of 6 mm and 10 mm.


I think this is moving away from being a cargo bay to corridor on a spaceship. I might need to cut an inch off each bulkhead.
I completed work on the walls and bulkheads by etching in panels.


I started working on the door, cutting a piece of foam for the door and card for the pattern.


Painting the Cargo Bay
Undercoat done


A grey base coat has been added to the walls. At the time of these pictures I had only painted one side of each of the bulkheads but this has now been rectified.


I decided to completely change the colour scheme, moving away from the Imperial grey I had started. Using only my airbrush to apply this, I’ve used gunmetal for the bulkheads, door and floor plates by the door. Cooper on the walls and arctic blue for floor.


I’m going to paint steel around the cooper plates and use it to edge the bulkheads and door.
The walls I’ve weathered with Games Workshops Athonian Camoshade, the door has been edged with silver. The bottom of the two walls and behind the bulkheads I’ve used Venice Grey. I’ve dry brushed the floor plating by the door with silver.


I have added and extra layer of 6mm foam board to the walls and floor to help strengthen them, especially from the amount of use this and the other sets will be getting.


When the glue and paint is dry, I just have a few more things to do with them.


Final Pictures


Building a Temple Room
I the foam is cut and ready to turned into the seventh set, just toying (excuse the pun!) with ideas.


The brick work has been marked and scored into foam.


I’ve added a plummet around the top of the three walls, adding brick work to it. I’ve started to add wall decoration to both side walls.


I’ve added more detail to the additional feature.


While building this set I’ve used PVA glue which takes longer to dry, because of this I have left the entire set alone for a couple of days.
Now its dry I’ve sanded down the sides and re-worked the brick work.
This is now ready to start painting.


Painting a Temple Room
Started with a black undercoat, I then painted the walls with a grey mixed with a touch of blue. To apply the paint, I used a roller with a sponge head which left the black in between the stone slabs intact (mostly).


I made up a dark grey mix and used a sponge to dab it all over. After it had dried, I added white to the grey and used it in between slabs of all of the surfaces. Then dry brushed it with Venice grey.


All that needs to be done now is add the matte varnish and then paint the back with black.
I added my Sith Throne to see how it looks.


Final Pictures


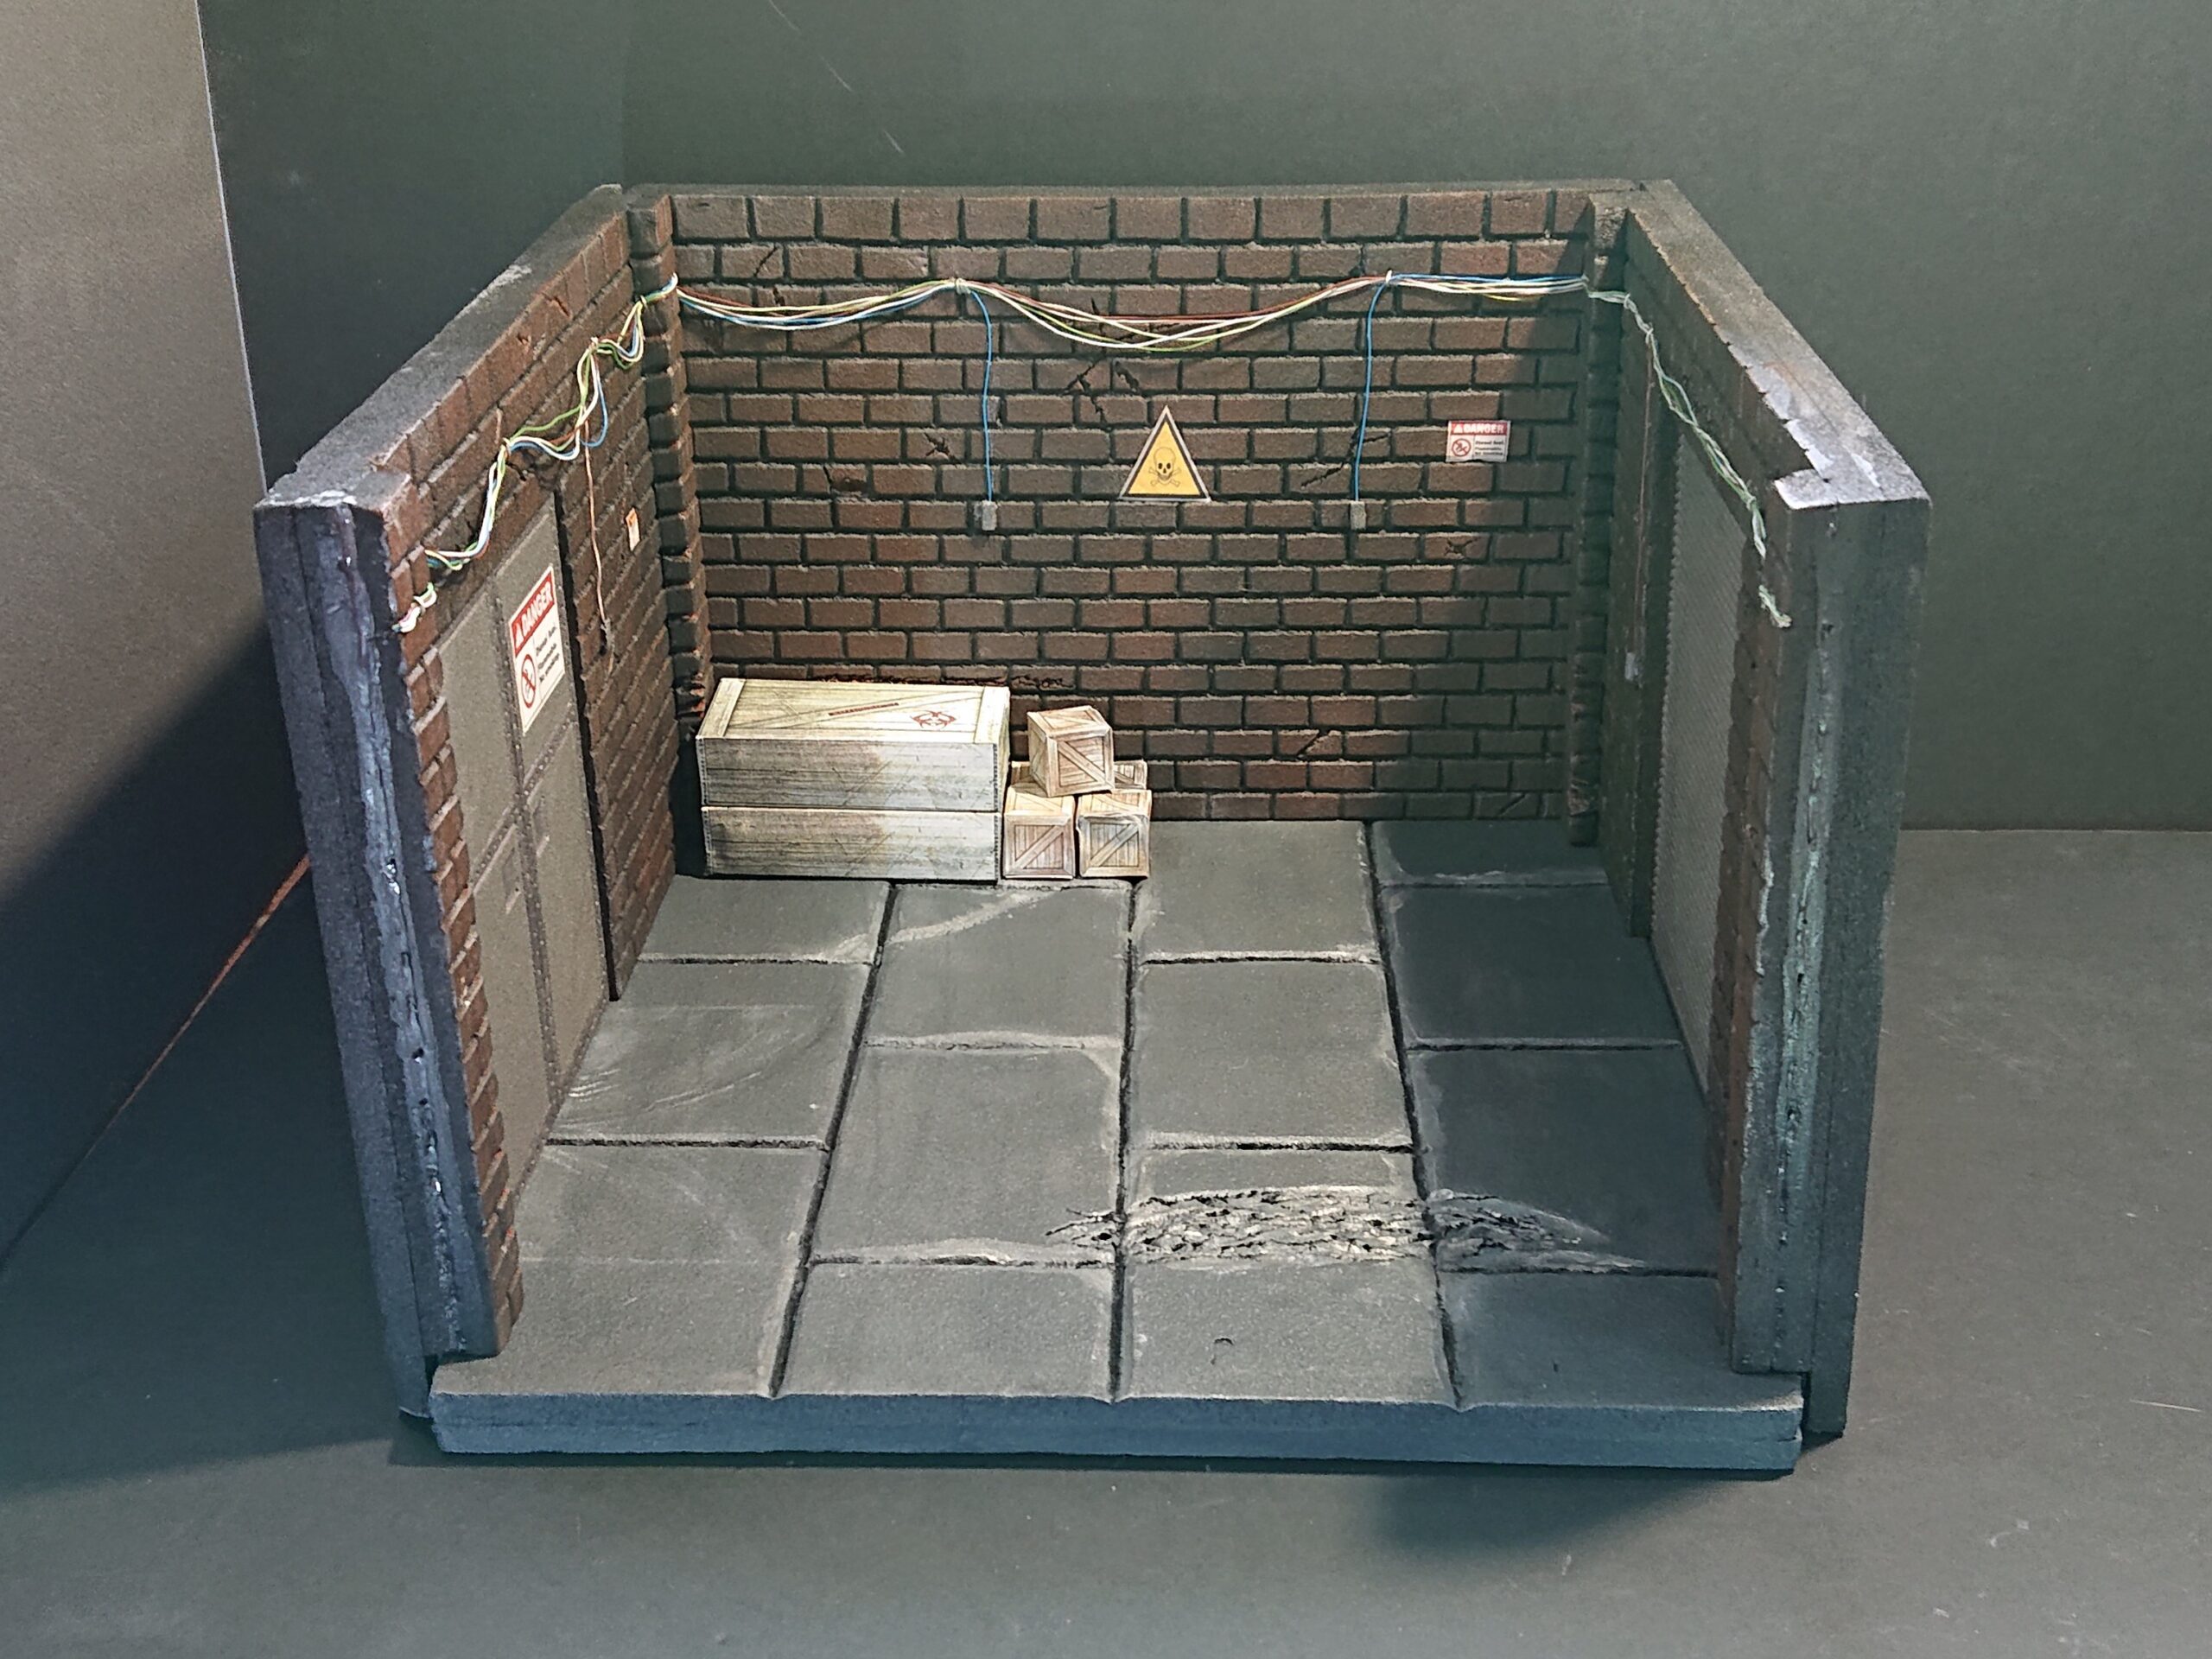
Building a Warehouse
The foam board is cut and the final empty stage is ready to be built upon!


I’ve decided to make this final piece based on a warehouse. So far I have scored the brick work into the three walls and paving slabs into the floor. Both side walls, I’ve cut out two doors ways, one will be a garage door and the other will be a double door.


What do you do when you wake up at 4:30 am and can not sleep, I get up and start back on this project which I’ve been suffering with builders block with! It had to happen at some point!!
I’ve added load bearing columns to either side wall along with a bit of brick and floor weathering. I’ve cut a piece of corrugated card for one of the entrances and now just need to add a set of double doors to opposite side.
With that done then I can start painting!


Painting the Warehouse
A Sunday afternoon of painting, I’ve started by undercoating each wall with black. Followed by a base coat of burnt sienna. Mixing a light brown and painted inside the brick cracks. I mixed up a dark brown, taking a sponge and dabbed the dark brown over the walls.


The floor was painted with dark grey highlighted with a lighter grey while the dark grey was still wet. I then highlighted again with a touch of white.
While that was drying cut and carved a piece of 6 mm foam to be a double door. This and the corrugated card where painted metallic grey. The edges of the door where then painted with a metallic blue and washed with over with a black solution. Both the doors have been glued into place.


Mixing a dirty brown wash, I have washed over the floor and walls to age this piece.


I have finished adding decals and accessories to this final piece. All that’s us left to do us varnish the paint work and then all eight animation model-boxes will he complete!
To add to the warehouse effect, I’ve added some paper crates.


Final Pictures


Animation
I purchased an animation kit for my daughter and I to learn, and during this time of lockdown due to Covid-19 it is time to road test these commission pieces for what they will be used for. Model sets for children’s animation lessons. My daughter is having lots of fun with Jerry the blob.